This document provides step-by-step deployment guidance for USB Disk Security (Standard Edition) and PrivateDLP (Pro Edition) endpoint clients using the EXE installer package. Tailored for individual evaluators, small teams and small-batch deployment administrators, it covers the full workflow including installer acquisition, local client setup, web console registration, free trial activation, paid license binding and post-deployment verification. The EXE installer is designed for single-device or small-scale rollout, requiring manual license configuration and console binding for each endpoint. Both product editions share an identical EXE installation workflow and client interface; functional differences are enabled automatically based on the activated license type. This guide is intended for end users, IT support staff and security administrators deploying the software on individual Windows devices.
1. Overview
The EXE installer is the standard distribution format for individual trial users and small-scale deployments of both USB Disk Security and PrivateDLP. Unlike the enterprise-grade MSI package (which supports pre-authorized bulk deployment and automatic console binding), EXE installations require manual license activation and endpoint binding to your organization’s web management console.
Both products use the same base client and unified user interface. After installation, the product edition and full feature set are determined by the license you activate: a Standard license unlocks core USB and network security controls, while a PrivateDLP Pro license enables advanced AI audit and file transfer logging features.
All policy configuration, monitoring and audit operations are managed through a centralized web console. Every endpoint installed via EXE must be manually bound to your admin console to enable remote management and policy synchronization.
2. Pre-Installation Prerequisites
Before proceeding with installation, confirm the target device meets the following requirements:
Operating System: Windows 7, Windows 10, Windows 11, or Windows Server 2016 and later
System Permissions: Local administrator privileges on the target Windows device (required for security driver installation and policy enforcement)
Network Connectivity: Stable internet access for installer download, license verification and web console synchronization
Admin Console Account: A valid Google account to register and access the centralized web management console
Compatibility: No conflicting third-party endpoint security software with overlapping USB control or system monitoring features enabled during installation
3. Step 1: Download the EXE Installer
Download the EXE installer corresponding to your target product edition.
3.1 USB Disk Security (Standard Edition)
The Standard Edition EXE installer is publicly available with no pre-application required:
Navigate to the official USB Disk Security product page.
Download the latest EXE installer file directly to your target Windows device.
3.2 PrivateDLP (Pro Edition)
The Pro Edition EXE installer is distributed after trial approval:
Visit the PrivateDLP Pro product page at https://privatedlp.com/products/usb-disk-security-pro.
Submit a formal trial request via the page form.
Once your request is approved, you will receive a download link for the PrivateDLP EXE installer via email.
4. Step 2: Install the Client via EXE Setup Wizard
The installation workflow is identical for both product editions. Follow these steps to complete local client installation:
Locate the downloaded .exe installer file on your target device.
Recommended: Right-click the installer file and select Run as administrator to avoid permission-related installation failures.
If prompted by Windows User Account Control (UAC), click Yes to allow the application to make changes to your device.
The setup wizard will launch. Follow the on-screen prompts:
Review and accept the end user license agreement (EULA).
Select your preferred installation directory, or keep the default system path.
Click Next to proceed through each configuration step.
Click Install to start the installation process.
Once installation completes, click Finish to exit the wizard. The endpoint client will launch automatically.
5. Step 3: Register and Log In to the Web Management Console
You must register and access the web admin console before activating your client, as the endpoint will bind to the console account used for activation.
Open a web browser and navigate to the console login page: https://privatedlp.com/dashboard/login
Click the Sign in with Google option.
If you are already signed in to your Google account in the current browser, you will be automatically registered and logged into the admin console in a single step.
After successful login, you will gain access to the endpoint management dashboard, policy configuration modules and audit features corresponding to your license tier.
6. Step 4: Activate License or Start Free Trial
EXE-installed clients require manual activation to bind to your admin console and unlock full features. The activation interface is identical for both product editions.
6.1 Access the License Configuration Panel
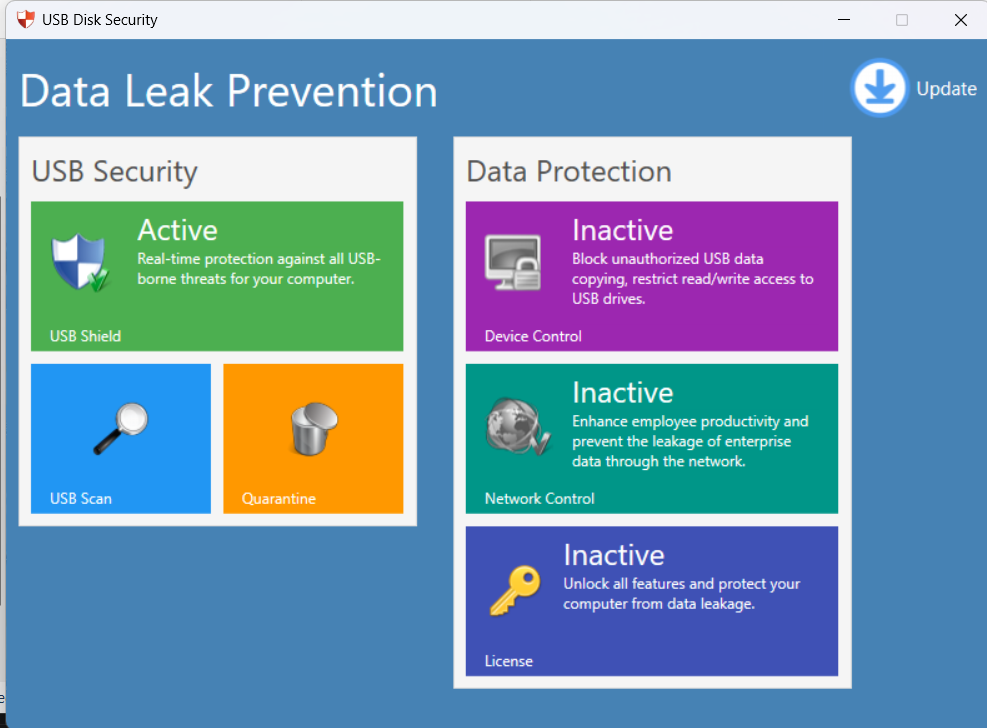
On the client software main dashboard, navigate to the Data Protection section.
Click the License tile (marked with a key icon, located at the bottom of the Data Protection panel).
A dedicated license configuration pop-up window will appear, with input fields for email and license code.
6.2 Start 15-Day Full-Feature Free Trial
If you are evaluating the product, activate the free trial to unlock all features for 15 days:
In the license pop-up window, enter the Google email address you used to register and log in to the web admin console.
Click the Start Trial button.
The client will connect to the licensing server, activate your 15-day trial, and automatically bind the endpoint to your web console.
Note: The trial version provides full, unrestricted access to all features of the corresponding product edition, with no functional limitations compared to a paid licensed version.
6.3 Activate a Paid License
If you have purchased an official license, activate it with your issued license code:
In the license pop-up window, enter the Google email address associated with your web admin console account.
Enter your official license code in the License Code input field.
Click the Activate button.
The client will verify your license online. Once verification completes, the full version will be activated, and the endpoint will automatically bind to your enterprise admin console.
7. Step 5: Post-Activation Verification
After successful activation, confirm the endpoint is properly connected and managed via the web console:
Refresh your web management console and navigate to the Home Overview page.
Locate the Device List and confirm your target device appears in the list with an Active subscription status.
Verify the device shows as Online once the client completes its initial heartbeat sync.
You can now configure USB control, software restrictions, browser policies, and (for Pro editions) AI audit rules centrally, and deploy them to the bound endpoint.
8. Deployment Best Practices for EXE Installations
For small-batch deployments across multiple devices, use the same Google admin account for all endpoint activations to consolidate management under a single console.
Always run the EXE installer with administrator privileges to ensure all security drivers and system-level controls are installed correctly.
Switch to the MSI package for enterprise-wide deployments with 10+ devices, to enable automatic licensing, bulk policy assignment and streamlined management.
9. Common Troubleshooting
Installation fails or exits unexpectedly: Confirm you are running the installer with local administrator privileges, and temporarily disable conflicting third-party antivirus or endpoint protection software during installation.
Trial/activation failure: Verify the entered email exactly matches the Google account used to log in to the web admin console, and confirm the endpoint has uninterrupted internet access to reach the licensing server.
Activated device does not appear in the web console: Restart the endpoint client software, or re-enter your admin email in the license panel to re-initiate the binding process. Ensure you did not register the console with a different Google account than the one used for activation.
Features are missing after activation: Confirm you activated the correct license tier (Standard vs. PrivateDLP Pro). Feature access is determined automatically by your license type, with no separate installer required for Pro features.